
One of the most annoying problems that most Directus users face is to implement calculated fields right in the Directus Database. There are a lot of Q&A in the Directus Community and also a lot of plug-ins that are unable to solve this problem completely. In this blog, I will instruct an alternative solution to resolve this problem using Directus Flow (You will get familiar with it if you have use n8n already).
Limitation on Directus extension#
Before going in directly into the Directus Flow, you guys should also know some alternative ways that can generate calculated fields, but still, has limitation.
Extension & Plug-in#
📝 This feature is useful for people who may want to view the calculated field in Directus. Not recommended for who want to use calculated field for API.
Directus users can access its marketplace right in Directus with the available extensions. With the annoying problem of calculated fields, of course, some developers have introduced the extension to get this done.
I have installed these 2 extensions on the Marketplace: Calculated Fields Bundle and Computed Interface. The latest one is from Mike Elsmore, Developer Experience Engineer @ Directus. You can also find the tutorial here: Calculated Fields Interface

Navigation: Setting → Marketplace → Search "Calculated Fields" → Installation Some highlight on this feature from Directus Docs:
- Display a calculated value based on any number of fields of an item.
- Supports the full set of functions provided by Formula.js.
- Supports a majority of JavaScript operators that work for numbers and strings.
- Use any M2O related fields in addition to root level fields.
Setting on Extension#
Once installed, users can access this function by going directly into the Data Model and create a new field. For the field interface or type, instead of choosing "Input" or related usual field types, you gonna choose "Calculated", installed in the previous step.

In the calculated field setting, there are different settings, but you may be familiar if you have used Directus for a while. However, there are 2 primary settings you need to note on this: Calculated Field Type and Formula.
Limitation on Extension#
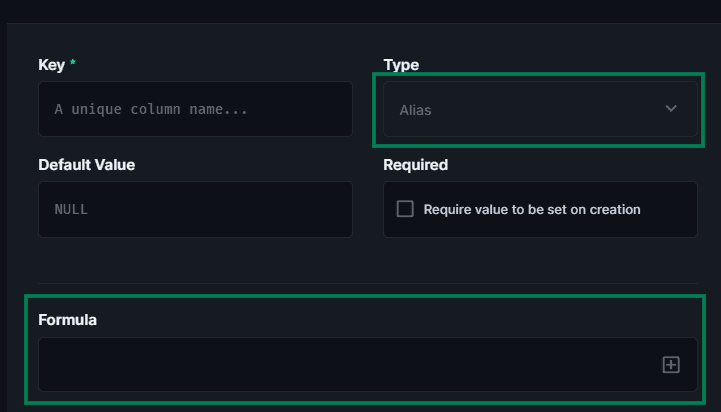
As you can see, the type of this field is Alias, which is the limitation of this extension. The primary use of this extension is for display only and API is not available.

Even for display, it has some limitations. In the table view, Directus user is unable to show the calculated.
For example, in my Data Model, I have 2 different field types: sample_qrcode (Input) and sample_sitename (Calculated).
One of the most important steps is applying formula to the field. For a non-tech user like me, AI helps a lot. Here is the way that I use:
- Step 1: Prepare your formula in Excel or other Spreadsheets. You will need to prepare the formula you want to convert and prepare the Field Mapping table. The reason why you need a Field Mapping table is that Excel formula uses Cell Position (A2, B2, etc).
For example:
Excel Formula: =CONCATENATE(B2, " - ", C2)
Field Mapping Table
B2 = product_category
C2 = item_code
- Step 2: Input the materials to AI (Gemini for my use case) Covert the following Excel formula into a Formula format for Directus Calculated Field
My Excel formula = <YOUR EXCEL FORMULA>
Field Mapping for my Excel = <YOUR FIELD MAPPING TABLE>
Output: Exclude the leading equals sign (=) from the original Excel formula.
- Step 3: Input the formula to Directus After AI generates the formula for you, you can copy and paste it to Directus formula setting in Calculated Fields. If the system does not recognize your mapping field, you may need to configure it again. If success, the Mapping Field will turn purple like this example

Note: You can also use field from other collections also as long as you have set up the relationship between two collections. For more information: Directus Field Relationships
Save and find the magic happens when navigate to the item detail (of course, no API & Layout)
Alternative - Directus Flow#
If you familiar with n8n or Make, Directus Flow should be your go-to method to automate all the thing you are struggle. In this post, I will deep dive into how to solve the Calculated Field only. We will begin will the checklist first:
- Formula that you want to be automated applied on specific fields.
- Convert the original variables (Cell B2 in Excel for example) to the field schema you have created in Directus itself.
- Build the flow
Formula conversion#
Of course, before you start, you already have in mind the formula you want to construct in Directus, right?
I will give a quick example, and you can start to build on that.

In this sample, I will have Sitename is the combination of Brand - Location. So you already have the formula:
1Sitename = CONCAT(Brand, " - ", Location)
And I will assume you have 3 fields: site_name, brand and location in Directus. All the elements in Directus have been gathered, let start building the flow!
Choosing your kind of trigger#
Directus will have various kind of triggers, simply explained below:
| Trigger Name | What It Does (A Simple Explanation) |
|---|---|
| Event Hook | Automatically starts a job when something happens inside Directus (like you create a new user or update a product). |
| Webhook | Starts a job when it receives a "call" from an outside app (like a "Contact Us" form on your website). |
| Schedule (CRON) | Starts a job on a repeating schedule (for example, "run this every morning at 9:00 AM"). |
| Another Flow | A tool for connecting jobs. It starts this job only after another automated job (a different "Flow") has finished. |
| Manual | This is a "start" button. The job only runs when you or another user manually clicks the button inside Directus. |
To make it simple like Excel, I gonna choose Event Hook → Action (Non-blocking) → items.create & items.update → Collection (the collection you want to cause the trigger)
Action (Non-blocking) means the flow runs after the event is already finished. The data is already in the database, and this flow runs in the background.

Short explanation: The flow will automatically run our calculation when a new item is first created and instantly re-calculate it if the source fields (like Brand or Location) are ever changed later!
Here is a concise example of how that works: On Create: You make a new item with
Brand= "Stark Industries" andLocation= "Malibu". When you save, the flow triggers and automatically sets theSitenameto "Stark Industries - Malibu".
On Update: Later, you edit that item and change the Location to "New York". When you save, the flow triggers again, automatically updating the Sitename to "Stark Industries - New York".
The initial set up is set! Now we head straight to the Canvas to build.
Canvas build#
After setting the trigger, our flow needs to perform three main jobs. Here’s a breakdown of each operation node:
| Node (Operation) | What It Does | Why We're KUsing It (For Our Sitename) |
|---|---|---|
| Read Data | Fetches the full data from a specific item. | The Trigger only tells us which item changed (its ID). We use "Read Data" to get all its field values (like the brand and location). |
| Run Script | Executes a piece of custom code (JavaScript). | This is our "calculator." We'll use this node to run our formula, combining the brand and location values into a single Sitename string. |
| Update Data | Saves new or changed data back to an item. | This is the final step. It takes the new Sitename string from our script and saves it back into the sitename field of the item that started the flow. |
Now we will come to the detail and configure every single node
1. Configure "Read Data"#
This node needs to fetch the item that just got created or updated.
- Collection: Choose your collection (e.g.,
stores). - IDs: This is the most important part. Set the ID to
{{$trigger.keys[0]}}. - Why? The
Triggerpasses along the ID (or "key") of the item that was affected. This special code tells the "Read Data" node to fetch that specific item.
Read Data Configuration
2. Configure "Run Script" (The "Calculator")#
We already knew our formula from the previous step, "Sitename = CONCAT(Brand, " - ", Location)". Now we convert the formula into code and paste it into the node.
1module.exports = async function(data) {2 // 1. Get the item data from the "Read Data" node3 // (Note: 'read_stores' is the name of my 'Read Data' node.4 // Yours might be different!)5 const item = data.read_stores[0];67 // 2. Make sure we have the data we need8 if (!item.brand || !item.location) {9 // Doesn't have the data, so just stop10 return;11 }1213 // 3. This is our CONCATENATE formula14 const newSitename = `${item.brand} - ${item.location}`;1516 // 4. Return the new value in an object17 return {18 "sitename_from_script": newSitename19 };20}
This is similar to the Code node in n8n
3. Configure "Update Data"#
This final node saves our calculated value back into the item.
- Collection: Choose the same collection (
stores). - IDs: Set this to
{{$trigger.keys[0]}}again, so the flow knows which item to update. - Payload: This is what we want to save. Click "Raw" and use the variable from our script:
1{2 "sitename": "{{data.Validation.sitename_from_script}}"3}
(Note: Validation is the name of my "Run Script" node. Yours might be different. sitename is the actual field in my database I want to save to.)
Activate and Test Your Flow!#
That's it! Save your flow and make sure it's Active.
Now, go to your stores collection and try it out.
- Create a new item: Fill in the
brandandlocationfields and hit save. You should see thesite_namefield magically populate itself! - Update an item: Go back to the item you just created and change the
location. Save it, and you'll see thesite_namefield update automatically.
Final thought#
While extensions like "Calculated Fields" are great for display-only purposes in the Directus app, they have limitations, especially when you need the calculated data available in your API.
By using Directus Flow, you've created a robust, server-side solution that solves this problem completely. Your calculated field is now:
- Automatic: It runs on every create and update.
- Real Data: The value is saved directly in the database, not just displayed.
- API-Ready: The
site_namefield will be available in your API for any frontend application (like Next.js) to use.
This is just the beginning of what you can automate with Directus Flow. Happy building!